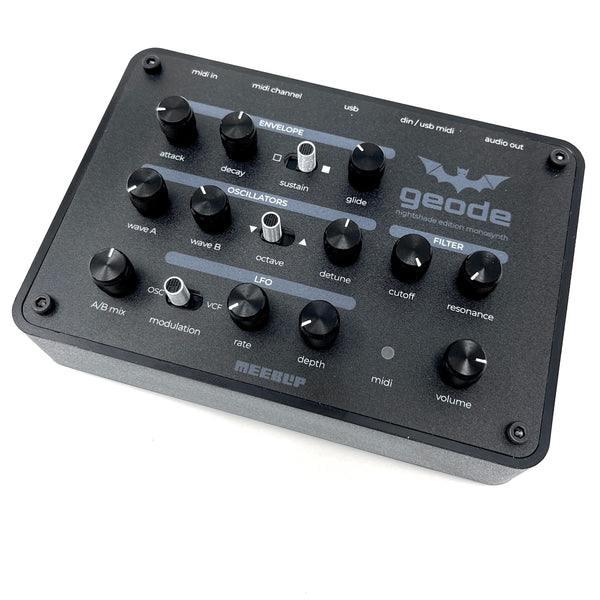
You never get it right the first time. A view of iterations of the MeeBlip board as it has gradually evolved, including several non-shipping prototypes.
A goal of the MeeBlip project is not only making our hardware open, but being open about what we learn making that hardware. We tended to keep some of that to ourselves at first, but now that we have something more meaningful to share, we’ll be a bit less shy. Getting things rolling, MeeBlip’s chief engineer James Grahame – no stranger to hardware design and manufacture – explains why making hardware can be … well, hard. Happily, with each mistake, you get a chance to get a bit smarter. But it can come down to something as simple as a ribbon cable. I’ll let James tell the story. -Peter
Designing and building boutique music hardware is hard. Anyone who tries to tell you different is either trying to sell you something or hasn’t tried it themselves.
A case in point — we shipped about a hundred MeeBlip SEs in mid-March. They started to arrive about a week later and I received an email asking for help to get a Quick Build kit running. That in itself isn’t that unusual, and we can usually get stuff sorted out in a couple of back and forth messages.
But this message was followed by another. And then another. For some reason, it seemed like quite a few boards were arriving DOA. That’s a rare occurrence, because the final assembly step before they leave is to program the latest firmware and play them for a minute or two. Continue reading »
We have a new, step-by-step guide to connecting and playing the MeeBlip SE. For all users of MeeBlips with the current firmware, this includes some explanation of how to get the most out of the new sound controls and synthesis parameters. And if you’ve got MeeBlip SE hardware, we show you how to load and save presets (at last!), as well as set the default MIDI channel.
So, if you’ve got a new MeeBlip, this is where to begin. And if you’re thinking about it, this will give you a taste of what the user experience is like.
The MeeBlip micro is a small project board, ready for everything from completely custom synth builds to wearable projects and installations requiring synthesis. (Really. More on that soon.)
Now that we have all our SE-generation MeeBlip hardware available, you may be wondering what the difference is between these models, and which you should get. (Actually, you might be wondering that even if you’ve already got a MeeBlip!)
We have three major models:
1. MeeBlip micro: Project board for true DIYers – no case, no knobs, compact size.
2. MeeBlip SE Build Everything Kit: Build your own full MeeBlip from parts, with some soldering and a bit of time.
3. MeeBlip SE Quick Build: Grab a screwdriver and a few minutes, and you’ve got a full MeeBlip, no soldering required.
How do decide:
Want to play sooner than later: If you want to get playing as quickly as possible, you should probably get the MeeBlip SE Quick Build. No soldering means you get going just about right away.
Love soldering: If you’re a DIYer and like to solder, you should get either the micro or the SE Build Everything.
Need something small and really inexpensive: If you’re short on cash and are happy using a MIDI keyboard or sequencer to control your MeeBlip – and don’t care much about having switches and knobs included – you should get a micro.
Want to design your own MeeBlip: If you want a board that’s as small as possible to make your own custom form factor, you should get a micro.
In fact, the best way to explain why it’s important for us to offer the micro is to explain why we changed the DIY kit version of the full-sized synth. So many people wanted the faders or knobs that it was simpler for us to just bundle all of it in the kit. That simplicity helps us ship faster and keep costs low for you.
But if you want to build your own custom enclosure and even completely reimagine the layout of the board, the micro is for you.
If you want a MeeBlip that’s easy to play, right away, the full-sized SE is probably a better choice than the micro. The micro is completely playable via MIDI, but the full-sized SE has dedicated knobs, switches, and even buttons for storing up to 16 presets. You can buy it either as a Build Everything kit, which requires a soldering iron and some time, or the Quick Build, which requires just a screwdriver and can be … um … quickly built.
Today, at last, we’re building and shipping MeeBlip SE. Whatever the “SE” stands for – seconda edizione, or a meaning of your own choosing – the MeeBlip SE is the original MeeBlip, but better. Building on the first version of our open source synthesizer, we’ve worked with feedback from users to make the MeeBlip more usable and more sonically versatile. New in this version:
A more intuitive, playable control layout. The changes are subtle, but after lots of conversations with users, we worked to make each knob and switch the choice we liked best. (Of course, you can still modify those choices via our open source firmware, if you like.)
Patch storage. Sure, it was a bit more “pure” never being able to store patches, but this is a digital synth, after all. Now, you can save and recall up to 16 patches right on the MeeBlip, using dedicated front panel load and save buttons. It’s especially nice for live performance.
Variable pulse width. Instead of a fixed square wave, you can now use the dedicated PWM knob to adjust the timbre of the first oscillator. There’s also a “pwm sweep” switch for enabling an automated PWM envelope, of which we’ve grown rather fond. Hello, thick synth leads.
Anti-aliasing. You can now use more pristine anti-aliased waveforms, or turn this off for other timbral effects. It gives you another option for coloring the MeeBlip’s sound.
Control everything with MIDI. It’s simple: if there’s a sound parameter in the MeeBlip, there’s a switch or knob to play with it. And now, the reverse is true, too: if you see a switch or knob, you can control it via MIDI. At last, you can use a tracker or sequencer to program detailed MeeBlip sounds.
Little, $39.95 MeeBlip micro kits await shipping. A fully-assembled board sits on top. MIDI, two oscillators, 16-bit virtual analog digital digital synthesis sound, LFO, resonant filter, 9V or battery power, ready to go.
Now available for immediate shipping, the MeeBlip micro fits the brains of the MeeBlip into a smaller, project-ready space – all for just US$39.95.
The MeeBlip micro kit requires assembly: you get a full board and all the parts you need, but you’ll have to solder them in place. Once you do, you get all of the features of the MeeBlip without the knobs and switches. That includes the 9V power connection (for a wall adapter or battery), MIDI input jack (for connecting keyboards and the like), 16-bit, hackable sound engine, and audio output. And you get all the goodness of the MeeBlip, with two-oscillator, virtual analog direct digital synthesis, LFO, 4-pole digital filter, and more.
Size: 4.5″ x 2.5″ (115mm x 64mm)
And like the MeeBlip, it’s all fully open source, and you can easily modify the firmware to suit your needs. (An inexpensive programmer is required; see our instructions. And watch for some tutorials on firmware soon.)
In place of the knobs and switches, you’ll find 8 analog inputs and 8 digital inputs. There’s no enclosure, but this would also be a good project on which to build your first enclosure, because it’s simple.
Who it’s for:
You’ll want a MeeBlip micro if you want:
A compact sound module to connect to a keyboard or other MIDI input. Built the micro, add an enclosure, and you’ve got a small, lightweight synth with MIDI input. If you’ve got a keyboard with 16 knobs on it, for instance, you can simply use those controls to play the MeeBlip micro in place of the usual front panel switches and pots. We know some of you want to do this, because you’ve told us!
A custom synth with your own control layout. Don’t like having the switches and knobs in rows? Want them in a big circle, for instance? MeeBlippers have already made some pretty amazing case designs, but with the full-sized MeeBlip board, you’re confined to our layout. With the micro, you can choose your own: you just connect the pots to the analog ins and the switches to the digital ins.
A great synth for a DIY project or installation. You don’t have to stop with knobs and switches. You could add IR distance sensors or knit an entire front panel out of conductive thread, for instance. Like the Arduino, the MeeBlip is at its heart a little computer with open-ended inputs; whereas the Arduino is a general-purpose board, the MeeBlip is uniquely suited to projects that want to add sound. You could even put a MeeBlip into an art installation or digitally-augmented dress. We’ll be looking at some of those possibilities over the coming months; your ideas and questions are welcome. Continue reading »
The new, metallic overlays. They’re shipping on new MeeBlip hardware, and available as an overlay upgrade – along with pre-programmed chip – for owners of the previous MeeBlip. But it’s not all about that shiny overlay: we’ve made changes to how you play the synth, and to how the firmware works.
The great thing about having a synth that has a chip for a brain is, it can evolve. So, as we played around with the MeeBlip ourselves, and got feedback from lots of you, it was clear that we wanted to make some changes to the switch and knob layout.
And then began the painstaking process of actually making those decisions. We spent lots and lots of time swapping one switch with another and arguing about what should be there. We’re indebted to you in our user community for giving us some feedback about what mattered to you, and very much, as well, to veteran synthesist, sound programmer, and producer Francis Preve (Keyboard Magazine, Academik Records).
Underneath, there are some significant changes to the firmware that make it more efficient and effective, which we’ll be talking about over the coming days. But let’s start with what this means for actually playing the MeeBlip. And remember, if you don’t like the decisions we’ve made, it’s called a “hackable” synth for a reason. I’m working now on a firmware mod tutorial for changing a knob setting or two, even for beginners who have never touched this stuff before, so you can make sure you’re happy with your ‘Blip.
We’re calling this whole generation MeeBlip SE, but the following descriptions apply to any MeeBlip with a front panel. (The firmware is available on the micro, too, but then of course you won’t have knobs and switches labeled since there aren’t any knobs or switches!)
One goal of the MeeBlip project was to share a bit of what goes on behind the scenes in making a synth. We haven’t done a great job of communicating what we’ve been doing lately, and we have been ourselves disappointed in unexpected delays in code development and shipping. But we have been very busy—one reason for our silence—and it’s time to share what’s been going on.
Simply put, both firmware and hardware have been delayed, but remedies are in sight.
The firmware was delayed for a simple reason: adding the features we wanted took far more effort than we anticipated. James has been working around the clock, inventing new techniques for squeezing the new waveform anti-aliasing and MIDI control features we wanted into this little synth’s brain.
The good news is that all of the new features we promised have been added and we started final firmware testing today. If you’re the adventurous kind, you can download it right now.
Hardware shipments were delayed by flawed manufacturing. We had to re-make an entire run of MeeBlip micro boards and re-do the assembly for the MeeBlip SE main board. The micro boards have arrived; we’ll post an update when we have information on the SE delivery. We do quality testing on every MeeBlip that ships to you, so the product you get won’t be affected; the only upshot is, we missed our self-imposed shipping deadlines! Here’s what that means for you:
Users of current MeeBlips, awaiting an upgrade: We’re testing the new release now, and will post an update when we begin physically shipping new overlays and pre-programmed chips to users. If you’re itching to take it for a spin (and have a chip programmer), the current firmware build is on GitHub, the new repository for all our open source code. As always, we’ll offer pre-programmed chips with the upgrades, too.
Customers awaiting MeeBlip micro, MeeBlip SE board kits: Both micro and board kits are in stock and will go out once they’re loaded with the new firmware, as we conclude quality testing on that code. We have offered a full refund to everyone who purchased these kits, but the wait should be very short.
Customers awaiting MeeBlip SE: We’ll post information once we have reliable shipping arrival estimates. Again, the handful of current customers have been offered refunds if they so choose.
If you’re waiting to place an order: We’ll post details of when you can expect to receive a MeeBlip based on solid information about shipping.
We’re on GitHub! We’re now placing firmware builds on GitHub, the new repository for all our open source code:
We’ll add more to that repository—including “hacked” forks for those who want them—over the coming weeks. If you’re adventurous, you can check out the code or try it yourself, but otherwise we’ll complete our quality testing and post an update here.
Where to stay tuned for updates: Subscribe to this blog, or follow @meeblip.
Peter and I started work on meeblip se about four months ago, based on a few ideas we had kicking around and some great feedback from users. The design retains the hands-on interface of the original, with the addition of features that make it more powerful (like an adjustable PWM waveform) and easier to use (patch storage).
meeblip se will be available in two versions:
1. A new front panel and pre-programmed microcontroller for existing MeeBlip owners — all the new features except programmable patch storage (there are no save/load switches on the original). Available soon for $25 [Update: We're adding a few last minute features based on some interesting feedback and feature requests].
2. New meeblip se hardware that includes patch save/load and midi channel buttons, power switch on the front panel, and an easier-to-assemble design (the I/O board now mounts directly to the back panel and connects to the main board with a single ribbon cable). There are also a few board tweaks to reduce noise.
The ‘rock horns’ panel design is gone (some loved it, others loathed it) and we’ve rearranged the controls to allow users to tweak the LFO and filter without having to use the ‘knob shift’ switch (which has been moved to the extreme right, so you can find it without looking).
New features:
Sixteen patch memories (accessed by tapping the save/load button and flipping one of the sixteen front panel switches)
Two envelopes – a dual-mode A/D or A/S/R amplitude envelope and an A/D envelope for the filter
Bandlimited oscillators (with optional raw waveforms, if aliasing is your thing)
Dual-mode PWM waveform on oscillator A. Select either a pulse wave with user-programmable width, or sweep the pulse width with user-programmable sweep speed
New triangle waveform on oscillator B
Filter envelope amount has been added to the front panel
Extended MIDI parameter control
A redesigned front panel
The new se hardware will be available in a few weeks for the same price as the original — $139, including multi-volt power adapter. You can pre-order a unit from the first batch by submitting a request on our contact page. We’ll be shipping directly from the USA to reduce shipping costs and increase delivery speed.
We’ve updated the MeeBlip DIY hacker kit after receiving lots of feedback from builders. The biggest change (apart from the color) is that the I/O jacks are now mounted on the bottom of the board. This will make it much easier to mount in a case or behind a panel. There are a number of other tweaks, too:
A new power switch on the top right of the panel
We’ve upgraded to a 1 Amp 7805 voltage regulator
The MIDI Channel DIP switch has been moved to the bottom rear edge of the board
We’ve removed the USB power connector and 3.5 mm audio jack
Analog and digital grounds are now split at the DAC for lower noise
We’ve also reduced the price to $69. The Full Board Kit includes the circuit board, components, programmed microcontroller and knobs. You can use your own 9 VDC power supply, or get one of our regulated wall warts for $9.
Does not include a case or panel overlays — that part is up to you. Be sure to share photos of your creations in the forum!
MeeBlip kits and accessories are available on our Get One page.
We got this question from Josh via our contact form the other day, regarding our demos:
Some of those are very aggressive, nicely Tron Legacy-like. However, one thing I haven’t found anywhere on the internet is a demo of the MeeBlip’s softer side, if it has one. Is it capable of producing beautiful, calm tones & pads? Something Mikael Fyrek/Planet Boelex-like. Nu-age-y. Not just harsh bitcrushed drones and noise, but more chilled stuff I can use for relaxing grooves. Ideally with a fresh, modern feel so that it doesn’t sound like something my NES would crank out.
I’d been looking for an excuse to spend some time making music with the MeeBlip, so I took this as an opportunity. Josh, I have no idea if this really answers your question, but I enjoyed it.
Doing thick, layered pads on the MeeBlip is going to be a challenge, as it’s a monophonic, one-voice, two-oscillator instrument. But that shouldn’t discourage you, necessarily. In this musical exercise, I simply took the mono output from the MeeBlip and ran it through reverb and compression in my host – the RV7000 reverb in Propellerhead’s Record (also found in Reason, though that has more limited audio input features).
To make the sound less aggressive, I just added a longer attack on the envelope; to add additional layers to the timbre without having more voices or polyphony, I used tuning and distortion to add harmonics.
I like playing live, so I just recorded four takes and mixed them together. The results came out a bit like low-rent Vangelis; let’s call it an homage.